Saturday, April 4, 2020

Making a Cheap Battleboard for the Final Battle

Okay, so my running of Paizo's Shackled City Adventure Path has reached the final climactic end battle. I experimented earlier with making battleboards using foam-core poster boards and decided I'd do a big one to make this battle more of an event.

First up I took a close look at the Chamber of the Tree in the Fiery Sanctum where the baddies constructed their big portal opening device. At 1 inch (25mm) to square on the map it would just fit on a 20" by 30" (500mm x 750mm) poster board.


I got some wrapping paper with 1" (25mm) squares printed on the back and taped it over the board. Then I used that grid to help free hand draw the main outlines of the cavern walls and lava channels.  When that was done I used a craft knife to cut through the paper along the traced lines to mark the actual board. Removing the now shredded paper I went over the cut lines in the board with black felt tip marker to outline everything. Next up came yellow fill with red and orange swirls for the lava channels.


For the lava rock floor I took the opportunity to use up some old gray acrylic paint I never really liked the shade of anyway.


 For the rock walls, I started with some cross hatching...

  ...then decided it looked totally awful...

...and painted over it with some brown so nobody would ever notice.

At the game I added four generic markers to portray the supports of the huge tree-shaped device. I'd made these a while back by gluing unpainted wooded pegs onto small square wood bases and painting them gray. They're handy for showing columns, trees, weird tall creatures, etc.


 ...and then the huge demons charge out of the shadows and attack!!!!

Our next game session will see if our heroes can fight their way back into the cavern in time to stop the activation ritual now underway (which they won't even notice is happening until a round or two from where we stopped last session).

Let's Talk About "The Longest Day in Chang'an" 《长安十二时辰》

Okay, so I finally finished watching "The Longest Day in Chang'an" 《长安十二时辰》on Netflix.  This is a massive new period drama from China, with 48 episodes for your extended viewing enjoyment. The basic plot is the Department of City Security in the capital of the Tang Dynasty, Chang'an, is aware of a plot to carry out some sort of massive terror attack during the Lantern Festival. They recruit Zhang Xiaoying, former soldier and security operative, from death row to lead the investigation--but they only have 24 hours to break the case.


The show apparently borrowed the format of the television show "24", but these episodes each cover 15 to 30 minutes. But before we go any further, watch these music videos of the two main songs with scenes from the show. They're basically trailers for the show and will give you a great sampler of what the show looks like--also great music.

短歌行 (A Short Ballad) "Tanka"
https://www.youtube.com/watch?v=RUUcnCECZio


《清平乐》 "Spring Day at the Royal Palace"
(sung by Zhang Zining of "Rocket Girls 101")

https://www.youtube.com/watch?v=ZI0rJGM-8lY


First off I have to say the production is movie quality rather than the typical cheap-looking TV show quality.  The locations and the costumes are visually stunning.  Huge effort (and expense) went into keeping everything as historical as possible. In some of  the daytime outdoor scenes the lighting is a bit off, but not badly. The main themes are intrigue, conspiracy, action, tragic back stories, and unrequited love.


I you want to delve a bit deeper into it, there also some cool "making of" videos about the series:

礼仪特辑《长安十二时辰》
(this one is about the various ways to bow or show respect in Tang China; 4:14)
https://www.youtube.com/watch?v=c8Yo21eEsDQ

服装特辑《长安十二时辰》
(this one is a detailed look at the clothing and armor of the Tang Chinese and foreigners: 4:32)
https://www.youtube.com/watch?v=3L_6wcm4gro

唐妆特辑:唐朝是色彩最浓郁的一个朝代《长安十二时辰》
(this one is about the makeup and hair styles)
https://www.youtube.com/watch?v=tO1JmFb4ABY


Saturday, March 14, 2020

Art Project: Painted Tabletop with Poured Resin Coating

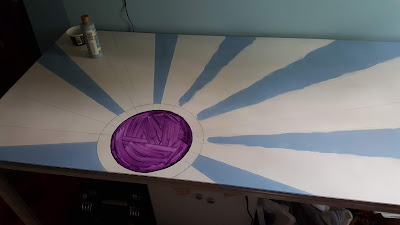
A while back my wife did a project putting a painted "marble" top on an old cabinet and then coating it with resin.  I really liked the way it turned out and was thinking of doing something myself I decided to upgrade my beat-up old craft table by sanding it down, painting a big graphic art piece on it, then sealing it with resin to protect the painting.  Deciding on what design and colors took a while, but I finally got it done.  Then came the scary part.  If you mess up while painting you can paint over it-- but if you mess up a resin pour you're done. About that time my local craft store had a going out of business sale so I was able to get some resin kits for a reasonable price.

But first a set of images showing the painting from bare table and sketches to finished piece:


1. Assemble everything you'll need: resin kits, mixing buckets, mixing cups, plastic sheeting, blow torch, and stirring stick.


2. Also get a fire extinguisher handy if the whole blowtorch thing goes sideways.   I watched several videos on YouTube and many suggested warming up the resin bottles in not-too-hot water to make them pour a bit better.


2. And here are some views of the final result:


I still have to paint the metal frame under it, but that's just some basic paint work.

Lessons Learned:

  • Making and pouring resin is actually pretty easy.
  • Make sure your work area is VERY WELL VENTILATED. The fumes from the mixed resin don't seem too bad at first.  But even with both windows and the door open I got very light headed part way through and had to get out and get some air to recover.
  • Make sure you have a bit more resin in your pour than the bare minimum.  The top came out well coated but the edges are a bit thin and not as smooth. I used three kits, the bare minimum, but should have used four.
  • For a wide area a smaller blowtorch is better. I bought a larger one with the idea that I had a larger area to cover and didn't want it to run out mid-project.  However, in trying to reach the middle areas I had to tilt it too far over (the flame needs to be about 2-3"/50-75cm from the surface). The blowtorch needed to be upright and flamed out when tilted over where I needed it.
  • You can actually use your breath as a source of CO2 rather than a flame, but be careful about breathing in those fumes!
  • Keep an eye on the drips off the underside of the edges. I wiped the undersides three times with about a half hour wait between each wiping. Some videos suggested taping, etc. but I found wiping a couple times worked just fine.

Sunday, February 23, 2020

Making an RPG Spell Template

Okay, so it's been a while now since my last post but just today I finished the main work on a spell template for role-play games.  I got the idea from some templates of this type which came up on Amazon while I was browsing. Most of them cost US$12 and up, plus shipping. They were all pretty simple and I remembered I had a bit of fairly stiff translucent plastic from an old report cover in my crafting box. Here is the project in photos: