
Showing posts with label map. Show all posts
Showing posts with label map. Show all posts
Sunday, November 4, 2018
New Campaign Hex Map Early Draft
So I'm slowly working on the hex map for my Forest of Fiends campaign idea which may or may not actually be a real thing one day. I'm using Hexographer which is is a very simple program. It makes getting started easy, but it's not long before you begin wishing it had more features. For most people making basic hex maps it perfectly adequate. For people who start making a crazy big map right away it leads to a lot of re-thinking your map as you go along, just saying. The map is for a semi-sandbox adventure with a coast, deep jungle filled with adventure, and finally a great cliff atop which lies (reportedly) the homeland of the fey.


Friday, January 30, 2015
Long Ride to a Short Death, an adventure for Neo School Hack
Now that I've done some design work for Neo School Hack, I thought it only proper that I do a beginner adventure (sorry, no boxed set).
The adventure begins with our heroes relaxing together at a small riverside trading post. They arrived here yesterday to await the post coach which will take them to the market town of ut-Frienne inland north of here. The region between the river and the town is deserty wilderness and travel with other people by coach is much safer and faster than going it alone on foot. A major combined festival and market day is starting at ut-Frienne tomorrow and the party member plan to attend. It's a great place to have fun, buy items outside of the usual, meet interesting people, join in religious parades, and make lucrative arrangements. [The players can decide whether they all came here together or arrived from separate places and got acquainted while waiting here. They also can decide on what their individual reasons are for traveling to ut-Frienne.]
.jpg)
-----------------------------------------------------------------------------------------------------------
While they relax on the veranda overlooking the river a river barge arrives, apparently one of the regular packet boats which travel up and down making deliveries and carrying passengers. A few scruffy sailors are on deck and the old man who runs the trading post, Postmaster Battu, sends his young son Yanny down to help with the ropes. However, one of the sailors leaps onto the small dock and holds a knife to Yanny's throat. More pirates swarm up from the hold where they were hiding. The leader of the river pirates, for that is what they really are, demands that the postmaster bring out his strongbox or the boy dies. The fat old postmaster begs the heroes to rescue the young fellow.
River Pirates
Captain Sa-granet: AC 10, HP 3, 2d10 attack/sword, dagger, small shield, leather armor; treasure: 2d10 gp
Pirates (minions, two for each party member): AC 8, HP 1, 1d10 attack/sword, dagger, small shield; treasure: 3d6 gp
The post coach arrives from ut-Frienne just before noon. Tierre the driver and Marchamp the guard, outlanders both, bring in a large wooden box with packages and scrolls mailed from the market town. Two remarkably similar merchants in purple turbans alight and get their luggage and baskets of something from the back of the coach. [The two merchants, Ju-thoth and Chu-thoth, are wizards as well as merchants. If the party asks, they have a spare scroll with the spell Darkvision which they will sell for 300 gp.] The driver and guard each grab a quick mug of ale and it's back on the coach to return towards ut-Frienne; the players must pay 1 gp for the two-day ride. [If asked, the two (human) coachmen are quite ready to regale the party with tales of the dangers ahead, most of which are greatly exaggerated but none totally fictitious.]
-----------------------------------------------------------------------------------------------------------
The countryside is desert, but varying from sandy flats, to dunes, to scrub land, to cactus forest. About two hours after leaving the post a band of masked marauders on camels gallops out of a cactus grove and heads for the coach, clearly intent on robbery or worse.
Camel Marauders
Chieftain: AC 12, HP 5, 2d10 attack/sword and 2 javelins; mail shirt and small shield; treasure: 6d6 gp
Marauders (two, plus one per party member): AC 12, HP 2, 2d10 attack/sword and 2 javelins; mail shirt and small shield; treasure: 3d6 gp
[The marauders ride up alongside the coach and throw all their javelins at the coachmen and passengers. If no one is killed or badly wounded by the time they are out of javelins they break off the attack and retreat back into the cactus grove--they enjoy a good fight, but not if it's a fair one. The marauders have a camp of tents deep in the grove. Along with ordinary camping supplies they have a chest with 150 gp in coins, a bit of amber with an irridescent green beetle in it (120 gp), and a Heal potion (heals 1 HP).]
-----------------------------------------------------------------------------------------------------------
Late in the afternoon, some hours after the contretemps with the marauders, a short but intense thundershower sweeps through the area. As it passes they spot their destination for the first evening of the trip: an old abandoned caravanserai. However there is a flock of huge vile vultures swarming around several carcasses near the gate-less entrance. The vultures are hungry and flocks of the vile variety are extremely aggressive towards interlopers.
Vile Vultures
(one per party member) 1 HP, AC 10, 2d10 attack/beak; treasure: none
The "meals" which the vultures were swarming are the body of a male civilized humanoid, probably half-elf, and his pack mule (Shairat Ulumu and Stinky). The body has a shortbow, a quiver with arrows, an elven shortsword, 32 sp and 4 cp on it, an old glazed tile with an ochre-on-white design of a stylized demon face, and a map. The mule has sacks and pouches with two dozen hardtack biscuits, three full water skins, a small tent, lantern, two blankets, 50 feet of rope, an old sledge hammer, a frying pan, and a map. [Hand players the no-labels dungeon map. Pro tip: use of a real dead mule as a fun prop for this encounter is not advised.] Despite the rain shower it is easy to see tracks indicating that the dead guy came from the northwest, where there is a mile of open scrub land leading to a large cactus forest.
.jpg)
Night begins to fall and the coachmen bring the coach into the courtyard of the caravanserai. The walls of the old place delineate a square about 100 feet on a side, lined on the north and south sides with the remains of several roofless buildings. Although abandoned long ago [when the well ran dry] it still makes for a useful overnight stopping place. The coachmen cut fronds of deaththorn from nearby and arrange them in a barricade at the gate.
In the night a gaunte creeps up outside the gate, attracted by the smell of tasty horses. It sniffs around the site of the dead guy and mule then sits motionless and observes for a while. If only one person is awake in the camp it will attempt to sneak in, subdue them (reduce to 0 HP), then carry them off to eat later. It has no interest in battle and will flee if confronted by two or more opponents (unless one or both is very badly injured).
Gaunte
AC 14, HP 6, two 2d10 attacks/claws; treasure: may be skinned for a lovely pelt worth 100gp
Shadowblend (constant): the rich black velvety fur of the gaunte allows it to blend into darkness almost anywhere in uncanny fashion, allowing it to reroll any failed rolls against anyone trying to spot it in the dark.
- The gaunte is a solitary nocturnal creature. Its appearance is rather like a tall (8 foot) humanoid black panther, with long arms and deep yellow eyes. Gauntes are almost as intelligent as people, making them exceptionally cunning predators.
-----------------------------------------------------------------------------------------------------------
[If the party decides to follow the tracks to explore the dungeon on the map (which they should if they want to have any fun at all) the coachmen explain that they have to stay on schedule, but they will be back in four days. Their route takes one more day to ut-Frienne, two days to go out and back to yt-Marbala, then one day returning from ut-Frienne en route to the trading post.]
The dead guy's trail leads northwest across the mile of scrubland to a cactus forest. However, once in the forest the trail grows faint and peters out in a clearing. There appear to be three possible traces continuing on from the clearing: one going northwest (with the craggy top of large jebel visible a couple miles beyond), one to the north, and one southwest (with the flat top of large jebel visible a couple miles beyond).
-----------------------------------------------------------------------------------------------------------
Northwest trail: two miles of cactus forest and come to deep, narrow cleft in jebel which leads about 100 yards in to a small cave screened by dry brush. A mother giant scarab is sleeping in the cave with her newly hatched swarm of hungry scarablings.
Giant Scarab
AC-14, 4 HP, two 2d10 attacks/claws; treasure: none
Scarab Beetle Swarm
AC-8, 4 HP, 3d10 attack,biting swarm
- Swarm/constant: it takes a lot of work to kill off a swarm of small critters; -2 to hit with non-magical ranged and melee weapons.
-----------------------------------------------------------------------------------------------------------
South west trail: three miles of cactus forest, ambush by guardian cactus sprites (small humanoid intelligent cactus people) on the way, then up a winding path to a Painted Stones Shrine atop the jebel to an elemental dust devil.
Cactus Sprites
AC 10, HP 2, 2d10 attack/spears; treasure: necklace of shiny rocks (1d10 gp)
Ouch, Spikey (constant): cactus sprites are covered in inch-long cactus spines which cause 1 wound to anyone grappling with them.
- there will be one sprite per player character
Elemental Dust Devil
AC-12, HP 8; treasure: 2 matching yellow gems (5d10 gp)
Gravel Storm/constant: the dust devil is a constantly whirling cloud of dust and gravel; anything in a 10 foot radius must make a Daring save or take a wound and be blinded for one round.
Rock Toss/focus: the devil forms a heavy rock and tosses it up to 50 feet; does 2 wounds
-----------------------------------------------------------------------------------------------------------
North trail: one mile of cactus, then a very ancient tomb with the stone door recently smashed open by an old sledgehammer (by the dead guy); see the Forgotten Tomb below.
-----------------------------------------------------------------------------------------------------------
-----------------------------------------------------------------------------------------------------------
The Forgotten Tomb of Ra-Nefesh IV
[Doors: all the doors in the tomb are large, heavy, and made of bronze with a fairly clever lock. Each door is AC 14 with 3 HP, but light weapons and pokey/stabbing or slicing weapons cannot do significant damage.]
Portico: Two life-sized stone statues of lions on platforms flank an open doorway on a now roofless portico. A pair of stone doors lie in ruins, smashed open quite recently.
Shersher (animated stone lions)
AC 14, HP 3, two 2d10 attacks/claws; treasure: none
- Shersher are magical statues place to protect places; the two here will activate only if someone tries to leave with the royal signet amulet from the Royal Crypt of Ra-Nefesh IV .
Antechamber: This room is dominated by a large statue (10' tall) of Ra-Nefesh IV. The faded wall frescoes show Ra-Nefesh IV living in power and luxury as a lord over servants, soldiers, slaves, and captives.
West Hall: this wide, dusty hallway has frescoes on both walls, showing a funeral procession of mourners, headed away from the antechamber. There are a few scattered human bones on the floor. [Trap: a floor tile halfway down the corridor has a lever under it which triggers dart tubes in the ceiling when stepped on. An Awareness check can spot the trap. If triggered, all creatures in a 10' x 10' area must make a Daring save to avoid being hit (for 1 wound).]
East Hall: this wide, dusty hallway has frescoes on both walls, showing a soldiers marching in formation, headed away from the antechamber. There are a few scattered human bones on the floor. [Trap: a 20' section of the floor halfway down the corridor has poison dust instead of normal dust, which is stirred up as creatures walk over it. An Awareness check can spot the trap. If triggered, everyone in the section must make a Brawn save or take one wound that round and another the next round.]
West Ossuary: this large hall has a high arched ceiling and six stone pillars, flooded to a depth of 3 feet, probably by seeping groundwater. The walls have multiple rows of large slots with bones piled in them. There are also bones on the floor to a depth of 2~3 feet. These are probably the bones of the mourners at Ra-Nefesh IV's funeral who were depicted in the frescoes in the hallway. The water and piled bones restrict movement to half normal walking pace. [Two rounds after a living humanoid enters the room, skeletons will arise from the bone piles and attack. Initially two will arise for every living creature in the room, plus one more each round that they remain in the room. The skeletons will not leave the room and collapse back into bones once an hour has passed with no living creatures in the room.]
Skeleton Mourners (minion)
- Creepy Undead/encounter: On first meeting, Commitment check or freeze for a turn
AC 10, HP 1, 1d10 attack/clawed bony fingers; treasure: small gold trinket (1d6 gp)
East Ossuary: this large hall has a high arched ceiling and six stone pillars. The walls have multiple rows of large slots with bones piled in them. There are also bones on the floor to a depth of 2~3 feet. Scattered in amongst the bones are helmets, spears, and shields. These are probably the bones of the soldiers at Ra-Nefesh IV's funeral who were depicted in the frescoes in the hallway. [Two rounds after a living humanoid enters the room, skeletons will arise from the bone piles and attack. Initially two will arise for every living creature in the room, plus one more each round that they remain in the room. The skeletons will not leave the room and collapse back into bones once an hour has passed with no living creatures in the room.]
Skeleton Soldiers
- Creepy Undead/encounter: On first meeting, Commitment check or freeze for a turn
AC 10, HP 1, 2d10 attack/spear, shield; treasure: small gold helmet badge (1d8 gp)
Hall of Noble Pillars: This room is a massive ceremonial funeral hall. At the south end is a large (20') richly painted and gilded statue of royal pharaoh Ra-Nefesh IV. It faces down between two rows of thick pillars carved to look like noble lords and ladies, males on the east and females on the west. [Trap: nobles were strictly segregated by gender at court functions. If a male humanoid enters the west half of the hall or a female one the east half of the hall then they must pass a Commitment save or be teleported back to the Portico. Also, four mummified priests wander here still fulfilling their sacred oath to protect the tomb from defilers and the unrighteous. They will attack anyone carrying a gold trinket or badge from either ossuary and anyone not of LN alignment. There are 50% more priests than party members.]
Mummified Priests
AC 12, HP 3, 2d10 attack/mace; treasure: a polished silver skullcap (100 gp) and matching bracelets (25 gp each)
- Creepy Undead/encounter: On first meeting, Commitment check or freeze for a turn
- Bonecurse (focus, encounter): casts a curse on one victim (30' range); if victim does not pass a Commitment save their bones warp for one day (24 hours), causing a -2 to all rolls for physical activity during that period.
Tranquil Grotto: This round, domed room has a deep pool of beautifully clear water in the center. Lovely frescoes on the ceiling depicting the smiling goddess Hathor surrounded by rosy clouds. [Trick: a drink of water from the sacred pool bestows +1 Commitment; a person may receive this benefit only once per day.]
Chamber of the Ancestors: this rectangular room is entirely lined with slabs of blue-and-white marble, giving the impression that it is floating amongst the clouds. Halfway down the room a statue stands in an alcove on either side. The statues are of fierce armored sebeki (crocodile people) warriors with spears and shields. The rest of the room is blocked off by a hanging tapestry showing condemned souls burning in lakes of hell fire. [Trap: the tapestry is a warning to those who would continue on and desecrate the final resting place of Ra-Nefesh IV. The statues will blast anyone getting between them with magical frost (Commitment save or take 1 wound from each statue). The magicked marble statues are AC 16 with 3 HP. Their magic cold attack can be neutralized by casting any fire-based spell on them or casting any water-based spell on them in reverse. The tapestry is also deadly: anyone touching it (even if wearing gloves, etc.) must make a Brawn save or be paralyzed for one week by the poison dust on it.]
Royal Crypt of Ra-Nefesh IV: This room contains a large stone sarcophagus of dark gray granite containing the mummy of the pharaoh. The walls and ceilings are completely covered in frescoes of the finest quality showing the pharaoh enjoying the afterlife in grand style. In each corner is a tall bronze urn. If anyone disturbs the sarcophagus or the urns the mummy of the pharaoh will push off the massive stone lid and attack any living creatures. He will pursue throughout the tomb, but not leave it.
Royal Pharaoh Ra-Nefesh IV
AC 12, HP 10, 2d10 attacks/heavy mace (2 wounds); treasure: magic +1 heavy mace, 4 bronze urns with 250gp each, royal signet amulet (gold and carnelian, 500gp), 1d6 ancient historical scrolls (50gp each)
- Creepy Undead/encounter: On first meeting, Commitment check or freeze for a turn
- Mummy's Curse/encounter: all opponents nearby must make Commitment save or -2 to all rolls until the mummy is destroyed
- Touch of Death/constant: the mummy may attack with an open hand (in addition to a normal attack with mace); if successful, victim must pass a Commitment save or the mummy drains 2 HP from the victim and adds them to its own HP
- Bonecurse/focus, encounter: casts a curse on one victim (30' range); if victim does not pass a Commitment save their bones warp for one day (24 hours), causing a -2 to all rolls for physical activity during that period.
.jpg)
The adventure begins with our heroes relaxing together at a small riverside trading post. They arrived here yesterday to await the post coach which will take them to the market town of ut-Frienne inland north of here. The region between the river and the town is deserty wilderness and travel with other people by coach is much safer and faster than going it alone on foot. A major combined festival and market day is starting at ut-Frienne tomorrow and the party member plan to attend. It's a great place to have fun, buy items outside of the usual, meet interesting people, join in religious parades, and make lucrative arrangements. [The players can decide whether they all came here together or arrived from separate places and got acquainted while waiting here. They also can decide on what their individual reasons are for traveling to ut-Frienne.]
-----------------------------------------------------------------------------------------------------------
While they relax on the veranda overlooking the river a river barge arrives, apparently one of the regular packet boats which travel up and down making deliveries and carrying passengers. A few scruffy sailors are on deck and the old man who runs the trading post, Postmaster Battu, sends his young son Yanny down to help with the ropes. However, one of the sailors leaps onto the small dock and holds a knife to Yanny's throat. More pirates swarm up from the hold where they were hiding. The leader of the river pirates, for that is what they really are, demands that the postmaster bring out his strongbox or the boy dies. The fat old postmaster begs the heroes to rescue the young fellow.
River Pirates
Captain Sa-granet: AC 10, HP 3, 2d10 attack/sword, dagger, small shield, leather armor; treasure: 2d10 gp
Pirates (minions, two for each party member): AC 8, HP 1, 1d10 attack/sword, dagger, small shield; treasure: 3d6 gp
The post coach arrives from ut-Frienne just before noon. Tierre the driver and Marchamp the guard, outlanders both, bring in a large wooden box with packages and scrolls mailed from the market town. Two remarkably similar merchants in purple turbans alight and get their luggage and baskets of something from the back of the coach. [The two merchants, Ju-thoth and Chu-thoth, are wizards as well as merchants. If the party asks, they have a spare scroll with the spell Darkvision which they will sell for 300 gp.] The driver and guard each grab a quick mug of ale and it's back on the coach to return towards ut-Frienne; the players must pay 1 gp for the two-day ride. [If asked, the two (human) coachmen are quite ready to regale the party with tales of the dangers ahead, most of which are greatly exaggerated but none totally fictitious.]
-----------------------------------------------------------------------------------------------------------
The countryside is desert, but varying from sandy flats, to dunes, to scrub land, to cactus forest. About two hours after leaving the post a band of masked marauders on camels gallops out of a cactus grove and heads for the coach, clearly intent on robbery or worse.
Camel Marauders
Chieftain: AC 12, HP 5, 2d10 attack/sword and 2 javelins; mail shirt and small shield; treasure: 6d6 gp
Marauders (two, plus one per party member): AC 12, HP 2, 2d10 attack/sword and 2 javelins; mail shirt and small shield; treasure: 3d6 gp
[The marauders ride up alongside the coach and throw all their javelins at the coachmen and passengers. If no one is killed or badly wounded by the time they are out of javelins they break off the attack and retreat back into the cactus grove--they enjoy a good fight, but not if it's a fair one. The marauders have a camp of tents deep in the grove. Along with ordinary camping supplies they have a chest with 150 gp in coins, a bit of amber with an irridescent green beetle in it (120 gp), and a Heal potion (heals 1 HP).]
-----------------------------------------------------------------------------------------------------------
Late in the afternoon, some hours after the contretemps with the marauders, a short but intense thundershower sweeps through the area. As it passes they spot their destination for the first evening of the trip: an old abandoned caravanserai. However there is a flock of huge vile vultures swarming around several carcasses near the gate-less entrance. The vultures are hungry and flocks of the vile variety are extremely aggressive towards interlopers.
Vile Vultures
(one per party member) 1 HP, AC 10, 2d10 attack/beak; treasure: none
The "meals" which the vultures were swarming are the body of a male civilized humanoid, probably half-elf, and his pack mule (Shairat Ulumu and Stinky). The body has a shortbow, a quiver with arrows, an elven shortsword, 32 sp and 4 cp on it, an old glazed tile with an ochre-on-white design of a stylized demon face, and a map. The mule has sacks and pouches with two dozen hardtack biscuits, three full water skins, a small tent, lantern, two blankets, 50 feet of rope, an old sledge hammer, a frying pan, and a map. [Hand players the no-labels dungeon map. Pro tip: use of a real dead mule as a fun prop for this encounter is not advised.] Despite the rain shower it is easy to see tracks indicating that the dead guy came from the northwest, where there is a mile of open scrub land leading to a large cactus forest.
Night begins to fall and the coachmen bring the coach into the courtyard of the caravanserai. The walls of the old place delineate a square about 100 feet on a side, lined on the north and south sides with the remains of several roofless buildings. Although abandoned long ago [when the well ran dry] it still makes for a useful overnight stopping place. The coachmen cut fronds of deaththorn from nearby and arrange them in a barricade at the gate.
In the night a gaunte creeps up outside the gate, attracted by the smell of tasty horses. It sniffs around the site of the dead guy and mule then sits motionless and observes for a while. If only one person is awake in the camp it will attempt to sneak in, subdue them (reduce to 0 HP), then carry them off to eat later. It has no interest in battle and will flee if confronted by two or more opponents (unless one or both is very badly injured).
Gaunte
AC 14, HP 6, two 2d10 attacks/claws; treasure: may be skinned for a lovely pelt worth 100gp
Shadowblend (constant): the rich black velvety fur of the gaunte allows it to blend into darkness almost anywhere in uncanny fashion, allowing it to reroll any failed rolls against anyone trying to spot it in the dark.
- The gaunte is a solitary nocturnal creature. Its appearance is rather like a tall (8 foot) humanoid black panther, with long arms and deep yellow eyes. Gauntes are almost as intelligent as people, making them exceptionally cunning predators.
-----------------------------------------------------------------------------------------------------------
[If the party decides to follow the tracks to explore the dungeon on the map (which they should if they want to have any fun at all) the coachmen explain that they have to stay on schedule, but they will be back in four days. Their route takes one more day to ut-Frienne, two days to go out and back to yt-Marbala, then one day returning from ut-Frienne en route to the trading post.]
The dead guy's trail leads northwest across the mile of scrubland to a cactus forest. However, once in the forest the trail grows faint and peters out in a clearing. There appear to be three possible traces continuing on from the clearing: one going northwest (with the craggy top of large jebel visible a couple miles beyond), one to the north, and one southwest (with the flat top of large jebel visible a couple miles beyond).
-----------------------------------------------------------------------------------------------------------
Northwest trail: two miles of cactus forest and come to deep, narrow cleft in jebel which leads about 100 yards in to a small cave screened by dry brush. A mother giant scarab is sleeping in the cave with her newly hatched swarm of hungry scarablings.
Giant Scarab
AC-14, 4 HP, two 2d10 attacks/claws; treasure: none
Scarab Beetle Swarm
AC-8, 4 HP, 3d10 attack,biting swarm
- Swarm/constant: it takes a lot of work to kill off a swarm of small critters; -2 to hit with non-magical ranged and melee weapons.
-----------------------------------------------------------------------------------------------------------
South west trail: three miles of cactus forest, ambush by guardian cactus sprites (small humanoid intelligent cactus people) on the way, then up a winding path to a Painted Stones Shrine atop the jebel to an elemental dust devil.
Cactus Sprites
AC 10, HP 2, 2d10 attack/spears; treasure: necklace of shiny rocks (1d10 gp)
Ouch, Spikey (constant): cactus sprites are covered in inch-long cactus spines which cause 1 wound to anyone grappling with them.
- there will be one sprite per player character
Elemental Dust Devil
AC-12, HP 8; treasure: 2 matching yellow gems (5d10 gp)
Gravel Storm/constant: the dust devil is a constantly whirling cloud of dust and gravel; anything in a 10 foot radius must make a Daring save or take a wound and be blinded for one round.
Rock Toss/focus: the devil forms a heavy rock and tosses it up to 50 feet; does 2 wounds
-----------------------------------------------------------------------------------------------------------
North trail: one mile of cactus, then a very ancient tomb with the stone door recently smashed open by an old sledgehammer (by the dead guy); see the Forgotten Tomb below.
-----------------------------------------------------------------------------------------------------------
-----------------------------------------------------------------------------------------------------------
The Forgotten Tomb of Ra-Nefesh IV
[Doors: all the doors in the tomb are large, heavy, and made of bronze with a fairly clever lock. Each door is AC 14 with 3 HP, but light weapons and pokey/stabbing or slicing weapons cannot do significant damage.]
Portico: Two life-sized stone statues of lions on platforms flank an open doorway on a now roofless portico. A pair of stone doors lie in ruins, smashed open quite recently.
Shersher (animated stone lions)
AC 14, HP 3, two 2d10 attacks/claws; treasure: none
- Shersher are magical statues place to protect places; the two here will activate only if someone tries to leave with the royal signet amulet from the Royal Crypt of Ra-Nefesh IV .
Antechamber: This room is dominated by a large statue (10' tall) of Ra-Nefesh IV. The faded wall frescoes show Ra-Nefesh IV living in power and luxury as a lord over servants, soldiers, slaves, and captives.
West Hall: this wide, dusty hallway has frescoes on both walls, showing a funeral procession of mourners, headed away from the antechamber. There are a few scattered human bones on the floor. [Trap: a floor tile halfway down the corridor has a lever under it which triggers dart tubes in the ceiling when stepped on. An Awareness check can spot the trap. If triggered, all creatures in a 10' x 10' area must make a Daring save to avoid being hit (for 1 wound).]
East Hall: this wide, dusty hallway has frescoes on both walls, showing a soldiers marching in formation, headed away from the antechamber. There are a few scattered human bones on the floor. [Trap: a 20' section of the floor halfway down the corridor has poison dust instead of normal dust, which is stirred up as creatures walk over it. An Awareness check can spot the trap. If triggered, everyone in the section must make a Brawn save or take one wound that round and another the next round.]
West Ossuary: this large hall has a high arched ceiling and six stone pillars, flooded to a depth of 3 feet, probably by seeping groundwater. The walls have multiple rows of large slots with bones piled in them. There are also bones on the floor to a depth of 2~3 feet. These are probably the bones of the mourners at Ra-Nefesh IV's funeral who were depicted in the frescoes in the hallway. The water and piled bones restrict movement to half normal walking pace. [Two rounds after a living humanoid enters the room, skeletons will arise from the bone piles and attack. Initially two will arise for every living creature in the room, plus one more each round that they remain in the room. The skeletons will not leave the room and collapse back into bones once an hour has passed with no living creatures in the room.]
Skeleton Mourners (minion)
- Creepy Undead/encounter: On first meeting, Commitment check or freeze for a turn
AC 10, HP 1, 1d10 attack/clawed bony fingers; treasure: small gold trinket (1d6 gp)
East Ossuary: this large hall has a high arched ceiling and six stone pillars. The walls have multiple rows of large slots with bones piled in them. There are also bones on the floor to a depth of 2~3 feet. Scattered in amongst the bones are helmets, spears, and shields. These are probably the bones of the soldiers at Ra-Nefesh IV's funeral who were depicted in the frescoes in the hallway. [Two rounds after a living humanoid enters the room, skeletons will arise from the bone piles and attack. Initially two will arise for every living creature in the room, plus one more each round that they remain in the room. The skeletons will not leave the room and collapse back into bones once an hour has passed with no living creatures in the room.]
Skeleton Soldiers
- Creepy Undead/encounter: On first meeting, Commitment check or freeze for a turn
AC 10, HP 1, 2d10 attack/spear, shield; treasure: small gold helmet badge (1d8 gp)
Hall of Noble Pillars: This room is a massive ceremonial funeral hall. At the south end is a large (20') richly painted and gilded statue of royal pharaoh Ra-Nefesh IV. It faces down between two rows of thick pillars carved to look like noble lords and ladies, males on the east and females on the west. [Trap: nobles were strictly segregated by gender at court functions. If a male humanoid enters the west half of the hall or a female one the east half of the hall then they must pass a Commitment save or be teleported back to the Portico. Also, four mummified priests wander here still fulfilling their sacred oath to protect the tomb from defilers and the unrighteous. They will attack anyone carrying a gold trinket or badge from either ossuary and anyone not of LN alignment. There are 50% more priests than party members.]
Mummified Priests
AC 12, HP 3, 2d10 attack/mace; treasure: a polished silver skullcap (100 gp) and matching bracelets (25 gp each)
- Creepy Undead/encounter: On first meeting, Commitment check or freeze for a turn
- Bonecurse (focus, encounter): casts a curse on one victim (30' range); if victim does not pass a Commitment save their bones warp for one day (24 hours), causing a -2 to all rolls for physical activity during that period.
Tranquil Grotto: This round, domed room has a deep pool of beautifully clear water in the center. Lovely frescoes on the ceiling depicting the smiling goddess Hathor surrounded by rosy clouds. [Trick: a drink of water from the sacred pool bestows +1 Commitment; a person may receive this benefit only once per day.]
Chamber of the Ancestors: this rectangular room is entirely lined with slabs of blue-and-white marble, giving the impression that it is floating amongst the clouds. Halfway down the room a statue stands in an alcove on either side. The statues are of fierce armored sebeki (crocodile people) warriors with spears and shields. The rest of the room is blocked off by a hanging tapestry showing condemned souls burning in lakes of hell fire. [Trap: the tapestry is a warning to those who would continue on and desecrate the final resting place of Ra-Nefesh IV. The statues will blast anyone getting between them with magical frost (Commitment save or take 1 wound from each statue). The magicked marble statues are AC 16 with 3 HP. Their magic cold attack can be neutralized by casting any fire-based spell on them or casting any water-based spell on them in reverse. The tapestry is also deadly: anyone touching it (even if wearing gloves, etc.) must make a Brawn save or be paralyzed for one week by the poison dust on it.]
Royal Crypt of Ra-Nefesh IV: This room contains a large stone sarcophagus of dark gray granite containing the mummy of the pharaoh. The walls and ceilings are completely covered in frescoes of the finest quality showing the pharaoh enjoying the afterlife in grand style. In each corner is a tall bronze urn. If anyone disturbs the sarcophagus or the urns the mummy of the pharaoh will push off the massive stone lid and attack any living creatures. He will pursue throughout the tomb, but not leave it.
Royal Pharaoh Ra-Nefesh IV
AC 12, HP 10, 2d10 attacks/heavy mace (2 wounds); treasure: magic +1 heavy mace, 4 bronze urns with 250gp each, royal signet amulet (gold and carnelian, 500gp), 1d6 ancient historical scrolls (50gp each)
- Creepy Undead/encounter: On first meeting, Commitment check or freeze for a turn
- Mummy's Curse/encounter: all opponents nearby must make Commitment save or -2 to all rolls until the mummy is destroyed
- Touch of Death/constant: the mummy may attack with an open hand (in addition to a normal attack with mace); if successful, victim must pass a Commitment save or the mummy drains 2 HP from the victim and adds them to its own HP
- Bonecurse/focus, encounter: casts a curse on one victim (30' range); if victim does not pass a Commitment save their bones warp for one day (24 hours), causing a -2 to all rolls for physical activity during that period.
Sunday, April 20, 2014
Review: Mistwyck and Woodmuir maps by Owlbear Maps
Okay, so I really like isometric view maps. It is a much more natural representation which enables you to immediately grasp the layout of a place. Top-down or plan style maps usually take a little bit of study to make sure one fully understands all the details. There aren't a lot of isometric maps available out there but I just bought the Mistwyck and Woodmuir isometric map pdfs from Owlbear Maps off Drivethrurpg.
Both are simple town maps, Mystwick being a tiny village and Woodmuir a larger settlement with a log palisade around it. The art style reminds me of the Asterix comic books, which I particularly like. Both maps are in black and white, which is fine, although at first glance you get the impression that they are winter scenes. The pdfs have an overview of the entire map, then pages with sections to print out and put together; the larger sections come in versions with and without a light blue isometric grid. There is also a legend for each map with a bit of info on selected locations.
The reason I bought these two maps is as starting locations for games. A while back I came up with the idea of having all the characters be from the same village and each player gets to pick the building in the town where the character lives. It provides a fun bit of engagement right at the start. Both these maps will work great for small starting towns for my games.
Bottom Line: I think both maps are great!
 |
| Mystwick (detail) |
Both are simple town maps, Mystwick being a tiny village and Woodmuir a larger settlement with a log palisade around it. The art style reminds me of the Asterix comic books, which I particularly like. Both maps are in black and white, which is fine, although at first glance you get the impression that they are winter scenes. The pdfs have an overview of the entire map, then pages with sections to print out and put together; the larger sections come in versions with and without a light blue isometric grid. There is also a legend for each map with a bit of info on selected locations.
The reason I bought these two maps is as starting locations for games. A while back I came up with the idea of having all the characters be from the same village and each player gets to pick the building in the town where the character lives. It provides a fun bit of engagement right at the start. Both these maps will work great for small starting towns for my games.
Bottom Line: I think both maps are great!
Monday, April 29, 2013
Map: The Dragon Spire
One of the things I did a lot with my last campaign, the one using the Big Eyes, Small Mouth (BESM) rules, was use artwork as inspiration for me and visual aid for the players. At one point they were on their way to meet with a dragon. I found a fantastic castle painting by the famous Ted Nasmith to use for the dragon's current hideout. Then I made up maps of the interior.
Background: this is an old frontier watch tower built by the kingdom of the black (water) dragons many centuries ago. The dragon statues are of heroes of the kingdom who fell defending it. It had a small lighthouse to warn river traffic away from the rocks and a small village where the humans and other small servant races lived. Because the tower was meant for dragons all of its architecture is dragon-sized. Huge doors and windows, huge rooms, and soaring ceilings are common throughout. There is also a landing balcony so the dragons can fly in and out.
Today it is the lair or hideout of Ragecloud, the brother of the last dragon king. The king, Ragewave, is in suspended animation on the verge of death in another massive old complex. The brother seeks ways to finish off his brother once and for all in order to lift the curse and finally rule the kingdom himself. Ragewave has several dragonkin (15' tall bipedal draconic humanoids) as his elite bodyguards and leaders, fifty or so human guards, dragonpriests, and scouts, and a dozen or more demon-dogs which roam the tower and areas along the river banks.

Below the main keep is a small courtyard which covers the steep winding trail which leads up from the small village below. In the courtyard is a guard barracks with storage, bunkrooms, mess hall, and armory. There is also a small stable with a few horses for scouts and messengers. A tall statue of a dragon overlooks the courtyard from the northeast wall.

Keep Ground Floor
The massive main gates lead into a wide entrance hall with huge wooden double doors on the sides and an archway ahead. Pools of water stand on either side of the entrance so that travelers may refresh themselves. The rooms are mostly empty of furnishings except the kitchen in the back on the west. The central room has an artistic statue in the middle, a deep pool stocked with live fish from the river as snacks for the dragon and dragonkin, and a staircase leading up. At the very back is a large refuge room with secret doors concealed by carved scenes on the wall.

Keep 2nd Floor

Keep Landing Balcony
This floor has the landing balcony for the tower. Several demon-dogs roam here to protect against any landing by intruders (the local mountain troll tribes fly on bat-winged opossums, or oppossobats). In the main chamber a large teleportation disc is set into the floor.

Tower 1st Floor
The floor has huge windows on the east and west sides and huge wooden double doors to the north and south. The south doorway leads out onto a balcony with a large dragon statue on the ledge. The north doorway leads to a wide, open walkway ending in a small ancestor shrine with a traditional black stone stele with gold leaf dragonscript on it. The walls of the main room are hung with massive tapestries. A teleportation disc is set into the floor; it connects with the landing balcony floor down below.

Tower 2nd & 3rd (top) Floors
The 2nd floor contains two tall bronze lanterns on 15-foot tall stands flanking a teleportation disc set in the stone floor. There is also a huge carpet.
The Roof is open to the sky except for four stone arches meeting above the center. There is a teleportation disc connecting to the 2nd floor and a huge black ancestor stele (40' wide by 60' high). the stele has lines of dragonscript in gold leaf. On the floor in front of the stele are several huge candles.
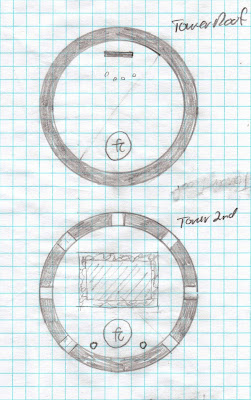
It's fairly simple, but with lots of room (literally) to add what ever you need for an adventure.
Background: this is an old frontier watch tower built by the kingdom of the black (water) dragons many centuries ago. The dragon statues are of heroes of the kingdom who fell defending it. It had a small lighthouse to warn river traffic away from the rocks and a small village where the humans and other small servant races lived. Because the tower was meant for dragons all of its architecture is dragon-sized. Huge doors and windows, huge rooms, and soaring ceilings are common throughout. There is also a landing balcony so the dragons can fly in and out.
Today it is the lair or hideout of Ragecloud, the brother of the last dragon king. The king, Ragewave, is in suspended animation on the verge of death in another massive old complex. The brother seeks ways to finish off his brother once and for all in order to lift the curse and finally rule the kingdom himself. Ragewave has several dragonkin (15' tall bipedal draconic humanoids) as his elite bodyguards and leaders, fifty or so human guards, dragonpriests, and scouts, and a dozen or more demon-dogs which roam the tower and areas along the river banks.
The painting:

The maps:
Overview and CourtyardBelow the main keep is a small courtyard which covers the steep winding trail which leads up from the small village below. In the courtyard is a guard barracks with storage, bunkrooms, mess hall, and armory. There is also a small stable with a few horses for scouts and messengers. A tall statue of a dragon overlooks the courtyard from the northeast wall.

Keep Ground Floor
The massive main gates lead into a wide entrance hall with huge wooden double doors on the sides and an archway ahead. Pools of water stand on either side of the entrance so that travelers may refresh themselves. The rooms are mostly empty of furnishings except the kitchen in the back on the west. The central room has an artistic statue in the middle, a deep pool stocked with live fish from the river as snacks for the dragon and dragonkin, and a staircase leading up. At the very back is a large refuge room with secret doors concealed by carved scenes on the wall.

Keep 2nd Floor

Keep Landing Balcony
This floor has the landing balcony for the tower. Several demon-dogs roam here to protect against any landing by intruders (the local mountain troll tribes fly on bat-winged opossums, or oppossobats). In the main chamber a large teleportation disc is set into the floor.

Tower 1st Floor
The floor has huge windows on the east and west sides and huge wooden double doors to the north and south. The south doorway leads out onto a balcony with a large dragon statue on the ledge. The north doorway leads to a wide, open walkway ending in a small ancestor shrine with a traditional black stone stele with gold leaf dragonscript on it. The walls of the main room are hung with massive tapestries. A teleportation disc is set into the floor; it connects with the landing balcony floor down below.

Tower 2nd & 3rd (top) Floors
The 2nd floor contains two tall bronze lanterns on 15-foot tall stands flanking a teleportation disc set in the stone floor. There is also a huge carpet.
The Roof is open to the sky except for four stone arches meeting above the center. There is a teleportation disc connecting to the 2nd floor and a huge black ancestor stele (40' wide by 60' high). the stele has lines of dragonscript in gold leaf. On the floor in front of the stele are several huge candles.

It's fairly simple, but with lots of room (literally) to add what ever you need for an adventure.
Wednesday, January 30, 2013
Map: New Campaign World Hexmap (draft)
Okay, so I'm working on my new campaign world. I decided early on that one thing I needed to get down early in the process was the world map. Once I got to the point where I was detailing the historical events of the inhabitants geography would have to play a big part. I tried doing it in Campaign Cartographer 2 but found that drawing continents was just too fiddly and frustrating. Then I bought Hexographer to try out. Hex maps are pretty crude but I think of Hexographer as a sort of rapid prototyping tool good for slapping down terrain quickly.
The world for my setting is a divinely-created flat world with a sky dome over it. It floats amidst the roiling elemental chaos and thus needs something to hold it together. That something is a set of five elemental nodes, one for each of the five elements (earth, fire, wood, metal, and water). Water (cold) is in the north, wood in the east, earth in the center, metal in the west, and fire in the south. These nodes influence the weather, terrain, and flora & fauna in their area of the world.
Note the different water depths, which go from shallower in the south to deeper in the north. The northern continent is really just a huge ice mass. Naturally there are miles of tunnels and caves down in there. Also, see the ice island over on the west? I plan to have a huge iceberg perpetually circling it on currents. Carved into it is an ice city inhabited by the descendants of the followers of an exiled dwarf who tried to crown himself emperor. Due to the magical basis of the island having formed around something in the first place, the dwarves there are all now creatures of elemental cold. The cold preserves them in a sort of immortality--as long as they stay on the iceberg.
.png)
The world for my setting is a divinely-created flat world with a sky dome over it. It floats amidst the roiling elemental chaos and thus needs something to hold it together. That something is a set of five elemental nodes, one for each of the five elements (earth, fire, wood, metal, and water). Water (cold) is in the north, wood in the east, earth in the center, metal in the west, and fire in the south. These nodes influence the weather, terrain, and flora & fauna in their area of the world.
Note the different water depths, which go from shallower in the south to deeper in the north. The northern continent is really just a huge ice mass. Naturally there are miles of tunnels and caves down in there. Also, see the ice island over on the west? I plan to have a huge iceberg perpetually circling it on currents. Carved into it is an ice city inhabited by the descendants of the followers of an exiled dwarf who tried to crown himself emperor. Due to the magical basis of the island having formed around something in the first place, the dwarves there are all now creatures of elemental cold. The cold preserves them in a sort of immortality--as long as they stay on the iceberg.
World Hex Map
.png)
Sunday, January 27, 2013
Map: Port Zarasa
Okay, so this is the full map from which the Desert Scholar's House map was taken. I originally put it together for a murder mystery adventure set in the desert land of Osirion in Pathfinder's Golarion campaign setting. Later I renamed it Port Zarasa to change the location, although I then realized that the new location wasn't a desert region anyway. This map was made with Campaign Cartographer 2.
.JPG "Map of Port Zarasa")
Map of Port Zarasa
.JPG "Map of Port Zarasa")
Saturday, January 26, 2013
Map: Desert Scholar's House
Okay, so here's another map I did up but this time with Campaign Cartographer 2 (CC2). This one's an older one I dug out of my folders. It was part of a small desert town I did up in CC2 a couple years ago. I'm going to see if I can get the entire town to load up so I can post it. I found that CC2 had a tendency to ruin map projects by either crashing or failing to save changes. I took to always keeping two copies of every map as I was working on them just in case. Even then I was always a bit nervous opening a file in case it got corrupted.

The Desert Scholar's House by the River

Thursday, January 24, 2013
Map: Tomb Temple of the Handfasted Wizards
Okay, so I've decided to do a rather more ambitious map than the one I did for Secret Santicore and an earlier small one. I've done a larger map than before and experimented with some new techniques. I drew the map on 0.25 inch blue-lined graph paper, scanned it in with the scanner's sepia tone setting, then added the spraypaint shading in Paint. Simple techniques but a decent result. The story I whipped up for it uses deities from the Forgotten Realms/Faerun campaign setting.
Eventually they grew old and used their magic to build themselves a tomb in secluded mountain dell. The tomb was designed with a crypt for each of them and shrines to the three deities of knowledge and magic. The location was revealed only to their closest followers. At last the two died, the first of old age and the second soon after of grief and despair. Their followers used magic items prepared ahead of time to secretly convey the bodies to the tomb, activate certain magics, and seal the entrance. The followers then took over ruling the town and neighboring valleys, calling the small territory the Mountain Magehold. Due to its secluded location the tomb remained undiscovered for many long years.
.jpg)
Tomb Temple of the Handfasted Mages
Long ago the wizard Geldross and the wizardess Emeniana fell deeply in love. Their romance began when they were studying magic at the same school and remained strong right until the end. Not being inclined towards most religions they joined their lives together in a traditional handfasting ceremony rather than a religious rite. Later in life they settled down in the small town of Aplennburg high in the mountains. By then they were powerful wizards and had several loyal followers who were themselves very accomplished. The pair soon came to be the de facto rulers of Alpennburg and the surrounding valleys. The people looked to them for protection and advice for both were adept in magic and studied many other sorts of lore and knowledge besides. The lovers gradually took up the worship of Mystra, Azuth, and Savras, these being the deities most closely associated with lore and magic, and built a combined temple to all three deities in the town. The temple had with it a school for local children and a small library to spread knowledge.Eventually they grew old and used their magic to build themselves a tomb in secluded mountain dell. The tomb was designed with a crypt for each of them and shrines to the three deities of knowledge and magic. The location was revealed only to their closest followers. At last the two died, the first of old age and the second soon after of grief and despair. Their followers used magic items prepared ahead of time to secretly convey the bodies to the tomb, activate certain magics, and seal the entrance. The followers then took over ruling the town and neighboring valleys, calling the small territory the Mountain Magehold. Due to its secluded location the tomb remained undiscovered for many long years.
The Map
.jpg)
Monday, January 21, 2013
Urbancrawl Rules for Slacker DMs: Chinese Takeout Style
Okay, so I occasionally drop by Zak S.'s blog "Playing D&D With Porn Stars" to see what he's got going on. Zak is a weirdo--in a good way (I think). He comes up with almost surreal ideas. Some I don't really like, some I don't really understand, but some are really brilliant. (This post is about one of the brilliant ones, BTW)
Today I stumbled on a very old post of his called Urbancrawl Rules for Slacker DMs. Sometimes RPG blogs have really interesting posts (hint, hint), but I digress. Anyway the Urbancrawl Rules are a way to run an urban sandbox "hex crawl" without any real prep other than the cool map which is not exactly a map. He starts by spelling out the numbers ONE through TEN in huge letters clustered together and somewhat distorted on a page. The letters are linked and the lines of the letters become the major thoroughfares. [Check out the pics on his post and you'll see what I mean.] But the problem is that once you have the city "map" underway, it's still obviously the words for one through ten. Cool when you first look at it as a concept, and a cool tool for DMs, but I think the final map will look dorky and preschoolish to anyone else.
Ah, but what if you used the Chinese characters for the numbers instead of English words? Well first let's take a look at those characters:

Hmm, not too bad. Of course to me it still looks like a jumble of Chinese words. But to someone who doesn't know characters it's probably a random oriental collage art thingy. Next is to put a piece of tracing paper on top (yes, there are paint programs, but I like hands-on art) and trace and extend the lines, making sure to trace each character in a separate color.
I'll get to that in a later post.
Today I stumbled on a very old post of his called Urbancrawl Rules for Slacker DMs. Sometimes RPG blogs have really interesting posts (hint, hint), but I digress. Anyway the Urbancrawl Rules are a way to run an urban sandbox "hex crawl" without any real prep other than the cool map which is not exactly a map. He starts by spelling out the numbers ONE through TEN in huge letters clustered together and somewhat distorted on a page. The letters are linked and the lines of the letters become the major thoroughfares. [Check out the pics on his post and you'll see what I mean.] But the problem is that once you have the city "map" underway, it's still obviously the words for one through ten. Cool when you first look at it as a concept, and a cool tool for DMs, but I think the final map will look dorky and preschoolish to anyone else.
Ah, but what if you used the Chinese characters for the numbers instead of English words? Well first let's take a look at those characters:
- 一
- 二
- 三
- 四
- 五
- 六
- 七
- 八
- 九
- 十
- 壹
- 贰
- 叄
- 肆
- 伍
- 陸
- 柒
- 捌
- 玖
- 拾

Hmm, not too bad. Of course to me it still looks like a jumble of Chinese words. But to someone who doesn't know characters it's probably a random oriental collage art thingy. Next is to put a piece of tracing paper on top (yes, there are paint programs, but I like hands-on art) and trace and extend the lines, making sure to trace each character in a separate color.
I'll get to that in a later post.
Tuesday, January 1, 2013
My Secret Santicore Gift: Below the Torch and Tankard (mini dungeon)
Okay, so we're off to another year! Happy New Year everyone! One of the things I'm hoping to add to my plucky little blog is some maps. As I mentioned recently, I'm a big fan of the maps by the gurus over at Dyson's Dodecahedron and Lapsus Calumni (check them out) and so I want to start doing maps on some sort of regular basis. Back around October I joined the Secret Santicore project for 2012 and was assigned doing a dungeon under a tavern. Although the project proper was postponed, a couple blogs have been posting the "gifts". I haven't seen my "gift" posted, possibly because it needed a map done for it by someone. I thought about posting just the text because anyone could sketch out a map from the descriptions but decided that would be kind of cheesy. So I did up a map yesterday and thought I'd go ahead and post the whole thing for everyone to peruse. It's an old school style dungeon, but system-neutral.
.jpg)
With Bravery, One Stands When They Fly
With Honesty, One Will Not Lose Face
With Loyalty, One Draws The Last Breath
The Torch and Tankard actually used to be the brewery of a larger monastery which stood here a long time back. It burned down in a huge fire and all they could save was the brewery. But before it was a brewery it was a mausouleum for a small paladin order, with three crypts for heroes of the order. The brewmaster accidentally let a huge hogshead get loose and it smashed through the crumbly old brick wall and revealed a passage beyond. Brewmaster Norgus took the antique motto scroll out of its frame over the bar and headed down.
0. Cellar of the Torch and Tankard. This 30' by 20' room is under the kitchen in the rear of the tavern. A flight of sturdy wooden stairs leads down, and there is also a big trap door they use to hoist the heavy kegs, barrels, and hogsheads into the cool cellar. The cellar is filled with the aromas of the many lovely beverages stored therein. The large opening in the north wall beckons, bits of rubble strewn nearby.
1. Entrance Hall. This marble-lined hallway has a 30' section with steps going down 10', a curving landing, and then another 30' section with steps going down a further 10'; the hallway is 10' high, and 5' wide. At the end is an open doorway. On either side of it is a niche with a life-sized statue of an angel. The angel on the left is holding a two-handed sword reverently in front of it; the one on the right is holding a shield and longsword at the ready.
[Trap 1: The phrase "With Humility, One Knows One’s True Place" is carved into the marble over the doorway. It is a clue that one must pass through the doorway bowed doubled over or kneeling or set off the trap. A spell to reveal magic will show the doorway is divinely enchanted. The first person through the doorway will trigger the divine magical punishment which will reduce their strength by half for 24 hours.
2. Ceremonial Chamber. This grand chamber is also lined with beautiful marble. It is 40' square with an arched ceiling 40' high in the center. In the middle of the room is a low basin set in the floor. It is apparently designed to hold liquid and is 2' deep at the center [water poured into this basin and prayed over by a good cleric will yield one flask of Holy Water per day.] A large ornate bronze lantern about 5' tall and 2' around hangs from a heavy bronze chain set in the center of the ceiling. There is an open doorway in the center of each side of the room. The one to the south has no wording over it and leads to the cellar of the Torch and Tankard. Each of the other three has one of the other mottoes carved into the lintel above it:
3. Hall of the Brave Brother. One the east side of the Ceremonial Chamber is an open doorway and above the doorway to this hall is the motto "With Bravery, One Stands When They Fly". From the doorway a set of steps leads down 5' to a straight hallway 30' long, 10' high, and 5' wide which slopes gently down towards a bronze-bound marble door with a very realistic carving of a medusa on it.
[Trap 3: Once all of the party has entered, a scary illusion of a spectral medusa will fly towards the party forcing each member to save against fear. Those who save (are Brave) will see that it is an illusion and receive an Ancient Blessing lasting 24 hours which gives them +1 to all rolls during that time. . Those who fail will be forced to flee and the illusion will rake them with spectral claws, the wounds on their backs marking them as cowards who ran away; even if the wounds are healed a set of scars (Marks of the Coward) will remain on their backs for 24 hours.]
3a. Crypt of the Brave Brother. The door to the crypt is unlocked. Inside is a 20' square room with an arched ceiling. The walls are carved with scenes of the warrior brother paladins bravely facing all manner of dangers. In the center is a plain marble sarcophagus with a massive bronze lid and the name "Holy Brother Lurien" engraved on the end facing the door. The lid has three long steel handles along each side with which to lift the lid. It takes at least two persons to lift the heavy lid
[Trap 3a: As soon as anyone gets within 5' of the sarcophagus, the handles heat up red hot (it will take bravery to grip those handles, won't it?). At least two of the people lifting the lid will need to pass a tough will or constitution save to hold the hot handles long enough to remove the lid entirely. Those failing the save will lose half their dexterity (for tasks requiring their hands) for 24 hours.]
4. Hall of the Honest Brother. Above the doorway to this hallway on the north is the motto "With Honesty, One Will Not Lose Face". From the open doorway a level hallway 30' long, 10' high, and 5' wide leads towards a bronze-bound marble door with a very realistic carving of a locked treasure chest.
[Trap 4: Once all of the party has entered they will each simultaneously experience a vision (the DM should take each player apart from the group to play out this scene). A voice, apparently the deceased brother, asks: "Has one finally come to take out my treasures? Are you the one who will remove them? Answer me that I may know if the day has finally come." A player who says no (an Honest person who would not rob a grave) will hear "Then may your prayers received favor"; they receive an Ancient Blessing lasting 24 hours which gives them +1 to all rolls during that time. A player who says yes (a dishonest person who would rob a grave) will be sprayed in the face with acid from holes in the walls and ceiling, thus being visually defiled ("losing face") as one who would defile.]
4a. Crypt of the Honest Brother. The door to the crypt is unlocked. Inside is a 20' square room with an arched ceiling. The walls are carved with scenes of the warrior brother paladins doing all manner of works of charity. In the center is a plain marble sarcophagus with a massive bronze lid and the name "Holy Brother Maronius" engraved on the end facing the door. The party will quickly discover that the sarcophagus can only be opened if the lid is swiveled--but a thief may detect that turning it one way unlocks it, the other way sets off a trap.
[Trap 4a: If they swivel it clockwise, the trap goes off. A blast of holy flame rips through the chamber. A save is allowed to dive out the door (if close enough). Damage should be about one third of health.]
5. Hall of the Loyal Brother. Above the doorway on the west to this hall is the motto "With Loyalty, One Draws The Last Breath". From the open doorway a set of steps leads up to a hallway 30' long, 10' high, and 5' wide straight towards a bronze-bound marble door with a very realistic carving of a two fully armored brothers of the order shaking hands.
[Trap 5: Once all of the party has entered they will each simultaneously experience a vision (the DM should take each player apart from the group to play out this scene). A suave and seductive voice enters their head and says "You know, there's a secret hiding place down here where the old brotherhood kept all their treasure. I know where it is. Gold is of no use to me where I am but sacrificed souls are; likewise souls are of no use to you there but gold is, isn't it? Let us make a pact: their souls for the gold--I can show you how to kill them easily with one of the deadly traps here." Characters who refuse receive an Ancient Blessing lasting 24 hours which gives them +1 to all rolls during that time. If the character agrees, a blast of poison gas shoots out from the walls and envelopes their head, causing them to lose half their constitution for 24 hours.]
5a. Crypt of the Loyal Brother. The door to the crypt is unlocked. Inside is a 20' square room with an arched ceiling. The walls are carved with scenes of the warrior brother paladins suffering martyrdom through all manner of cruel tortures. In the center is a plain marble sarcophagus with a massive bronze lid and the name "Holy Brother Culwen" engraved on the end facing the door. The party will soon discover that the massive bronze lid of the sarcophagous has spring-loaded catches on each corner which require one person on each corner working together to get it open (or if a party of less than four players, then just one person on each end).
[Trap 5a: If they attempt to open it any other way than the correct way, then the entire floor slides back into the walls. A save is allowed to jump up onto the sarcophagus or out the door, if close enough. Anyone left where the floor was will fall 10' into a pit full of spikes which now surrounds the sarcophagus. (The damage should be about one third of the health of the character.)]
DM Notes
.jpg)
Below the Torch and Tankard
It's a rough and tumble sort of place, but Brewmaster Norgus of the Torch and Tankard knows his craft. Well, until last week when he was found dead in the cellar with wounds and burns and cobwebs all about his body. In his hand he held an old bit of parchment with four poetic mottoes written on it. His wife, Nellie Norgus, couldn't care less about all that, but business dropped off once word got out--and besides, there's no way she's going down into the ale cellar until she's sure it's safe. She hands the party the parchment with the mottoes on it and wishes them good luck.The Old Poetic Mottoes
With Humility, One Knows One’s True PlaceWith Bravery, One Stands When They Fly
With Honesty, One Will Not Lose Face
With Loyalty, One Draws The Last Breath
The Torch and Tankard actually used to be the brewery of a larger monastery which stood here a long time back. It burned down in a huge fire and all they could save was the brewery. But before it was a brewery it was a mausouleum for a small paladin order, with three crypts for heroes of the order. The brewmaster accidentally let a huge hogshead get loose and it smashed through the crumbly old brick wall and revealed a passage beyond. Brewmaster Norgus took the antique motto scroll out of its frame over the bar and headed down.
0. Cellar of the Torch and Tankard. This 30' by 20' room is under the kitchen in the rear of the tavern. A flight of sturdy wooden stairs leads down, and there is also a big trap door they use to hoist the heavy kegs, barrels, and hogsheads into the cool cellar. The cellar is filled with the aromas of the many lovely beverages stored therein. The large opening in the north wall beckons, bits of rubble strewn nearby.
1. Entrance Hall. This marble-lined hallway has a 30' section with steps going down 10', a curving landing, and then another 30' section with steps going down a further 10'; the hallway is 10' high, and 5' wide. At the end is an open doorway. On either side of it is a niche with a life-sized statue of an angel. The angel on the left is holding a two-handed sword reverently in front of it; the one on the right is holding a shield and longsword at the ready.
[Trap 1: The phrase "With Humility, One Knows One’s True Place" is carved into the marble over the doorway. It is a clue that one must pass through the doorway bowed doubled over or kneeling or set off the trap. A spell to reveal magic will show the doorway is divinely enchanted. The first person through the doorway will trigger the divine magical punishment which will reduce their strength by half for 24 hours.
2. Ceremonial Chamber. This grand chamber is also lined with beautiful marble. It is 40' square with an arched ceiling 40' high in the center. In the middle of the room is a low basin set in the floor. It is apparently designed to hold liquid and is 2' deep at the center [water poured into this basin and prayed over by a good cleric will yield one flask of Holy Water per day.] A large ornate bronze lantern about 5' tall and 2' around hangs from a heavy bronze chain set in the center of the ceiling. There is an open doorway in the center of each side of the room. The one to the south has no wording over it and leads to the cellar of the Torch and Tankard. Each of the other three has one of the other mottoes carved into the lintel above it:
3. Hall of the Brave Brother. One the east side of the Ceremonial Chamber is an open doorway and above the doorway to this hall is the motto "With Bravery, One Stands When They Fly". From the doorway a set of steps leads down 5' to a straight hallway 30' long, 10' high, and 5' wide which slopes gently down towards a bronze-bound marble door with a very realistic carving of a medusa on it.
[Trap 3: Once all of the party has entered, a scary illusion of a spectral medusa will fly towards the party forcing each member to save against fear. Those who save (are Brave) will see that it is an illusion and receive an Ancient Blessing lasting 24 hours which gives them +1 to all rolls during that time. . Those who fail will be forced to flee and the illusion will rake them with spectral claws, the wounds on their backs marking them as cowards who ran away; even if the wounds are healed a set of scars (Marks of the Coward) will remain on their backs for 24 hours.]
3a. Crypt of the Brave Brother. The door to the crypt is unlocked. Inside is a 20' square room with an arched ceiling. The walls are carved with scenes of the warrior brother paladins bravely facing all manner of dangers. In the center is a plain marble sarcophagus with a massive bronze lid and the name "Holy Brother Lurien" engraved on the end facing the door. The lid has three long steel handles along each side with which to lift the lid. It takes at least two persons to lift the heavy lid
[Trap 3a: As soon as anyone gets within 5' of the sarcophagus, the handles heat up red hot (it will take bravery to grip those handles, won't it?). At least two of the people lifting the lid will need to pass a tough will or constitution save to hold the hot handles long enough to remove the lid entirely. Those failing the save will lose half their dexterity (for tasks requiring their hands) for 24 hours.]
4. Hall of the Honest Brother. Above the doorway to this hallway on the north is the motto "With Honesty, One Will Not Lose Face". From the open doorway a level hallway 30' long, 10' high, and 5' wide leads towards a bronze-bound marble door with a very realistic carving of a locked treasure chest.
[Trap 4: Once all of the party has entered they will each simultaneously experience a vision (the DM should take each player apart from the group to play out this scene). A voice, apparently the deceased brother, asks: "Has one finally come to take out my treasures? Are you the one who will remove them? Answer me that I may know if the day has finally come." A player who says no (an Honest person who would not rob a grave) will hear "Then may your prayers received favor"; they receive an Ancient Blessing lasting 24 hours which gives them +1 to all rolls during that time. A player who says yes (a dishonest person who would rob a grave) will be sprayed in the face with acid from holes in the walls and ceiling, thus being visually defiled ("losing face") as one who would defile.]
4a. Crypt of the Honest Brother. The door to the crypt is unlocked. Inside is a 20' square room with an arched ceiling. The walls are carved with scenes of the warrior brother paladins doing all manner of works of charity. In the center is a plain marble sarcophagus with a massive bronze lid and the name "Holy Brother Maronius" engraved on the end facing the door. The party will quickly discover that the sarcophagus can only be opened if the lid is swiveled--but a thief may detect that turning it one way unlocks it, the other way sets off a trap.
[Trap 4a: If they swivel it clockwise, the trap goes off. A blast of holy flame rips through the chamber. A save is allowed to dive out the door (if close enough). Damage should be about one third of health.]
5. Hall of the Loyal Brother. Above the doorway on the west to this hall is the motto "With Loyalty, One Draws The Last Breath". From the open doorway a set of steps leads up to a hallway 30' long, 10' high, and 5' wide straight towards a bronze-bound marble door with a very realistic carving of a two fully armored brothers of the order shaking hands.
[Trap 5: Once all of the party has entered they will each simultaneously experience a vision (the DM should take each player apart from the group to play out this scene). A suave and seductive voice enters their head and says "You know, there's a secret hiding place down here where the old brotherhood kept all their treasure. I know where it is. Gold is of no use to me where I am but sacrificed souls are; likewise souls are of no use to you there but gold is, isn't it? Let us make a pact: their souls for the gold--I can show you how to kill them easily with one of the deadly traps here." Characters who refuse receive an Ancient Blessing lasting 24 hours which gives them +1 to all rolls during that time. If the character agrees, a blast of poison gas shoots out from the walls and envelopes their head, causing them to lose half their constitution for 24 hours.]
5a. Crypt of the Loyal Brother. The door to the crypt is unlocked. Inside is a 20' square room with an arched ceiling. The walls are carved with scenes of the warrior brother paladins suffering martyrdom through all manner of cruel tortures. In the center is a plain marble sarcophagus with a massive bronze lid and the name "Holy Brother Culwen" engraved on the end facing the door. The party will soon discover that the massive bronze lid of the sarcophagous has spring-loaded catches on each corner which require one person on each corner working together to get it open (or if a party of less than four players, then just one person on each end).
[Trap 5a: If they attempt to open it any other way than the correct way, then the entire floor slides back into the walls. A save is allowed to jump up onto the sarcophagus or out the door, if close enough. Anyone left where the floor was will fall 10' into a pit full of spikes which now surrounds the sarcophagus. (The damage should be about one third of the health of the character.)]
DM Notes
- The traps outside the crypt chambers are meant to severely chastise unworthy intruders but give them a chance to escape alive and reconsider the choices they've made in life.
- The traps inside the crypts are meant to kill any intruders so clearly determined to do evil that they would persevere to rob the resting places of the honored dead.
Monday, December 31, 2012
My First Map!
Okay, so I'm a big fan of the charming maps over at Dyson's Dedecahedron and Lapsus Calumni. They're simple, quite usable, and have a quiet style which I like a lot. I thoroughly recommend both sites. I bought Matt's Moleskin Maps, Volume 1 and it's really great. But then I was thinking that with all the maps I've made over the years, I should be able to put something up here as well. However, the vast majority of those maps were just quick sketches with a few notes and/or a simple diagram on some graph paper. Few were attractive enough or, in some cases, comprehensible enough to other, to warrant offering them to anyone.
So, I studied the style Dyson and Matt use for their simpler maps and last night decided to have a try. My primary goal was to work on the various shading, texturing, and cross-hatching techniques. Here's the simple tomb I came up with.

So, how's that?
So, I studied the style Dyson and Matt use for their simpler maps and last night decided to have a try. My primary goal was to work on the various shading, texturing, and cross-hatching techniques. Here's the simple tomb I came up with.

So, how's that?
Subscribe to:
Posts (Atom)